Getting started
First run
What happens the first time Startica starts, and how the three-step welcome wizard connects an AI provider, adds your product and starts its intel.
The first time you open Startica, it creates its data folder and database, then opens Welcome to Startica: a short setup in three steps. You connect an AI provider, tell Startica what you’re marketing, and pick a few extras. It takes about two minutes, and you can skip any part of it. There’s no sign-up.
After the wizard, Today shows a Getting started checklist for the rest of setup. See Your first day.
Tip
Want to look around before you set anything up? In the desktop app, click Look around with a sample product first at the bottom of the wizard. See Try the demo.
What happens on launch
When Startica starts, it:
- Shows a “Starting Startica…” screen while its local server starts.
- Creates the data folder if it doesn’t exist, and opens
startica.dbinside it. - Applies any database migrations that haven’t run yet.
- Creates your workspace with the default model for each AI task.
- Starts the background job runner and its schedules.
- Opens Welcome to Startica on a fresh install, or the Dashboard once setup is done.
The data folder is:
| OS | Data folder |
|---|---|
| macOS | ~/Library/Application Support/Startica |
| Windows | %APPDATA%\Startica |
| Linux | ~/.config/Startica (or $XDG_CONFIG_HOME/Startica) |
See Data folder for what’s inside.
Startica also adds an icon to the menu bar (macOS) or system tray (Windows, Linux). Closing the window keeps Startica running there, so scheduled jobs continue. Choose Quit Startica from that icon’s menu to stop it.
When the wizard appears
The wizard opens while you have no product and haven’t finished or skipped it. Until then, every page in the app sends you back to it. Once you click Finish or Skip setup, it doesn’t come back on its own, even if you never added a product.
To open it again, go to Settings → General → App and click Run setup again. See Run setup again.
The progress row at the top shows the three steps: AI · Your product · Extras. A finished step gets a check mark.
Step 1: Connect AI
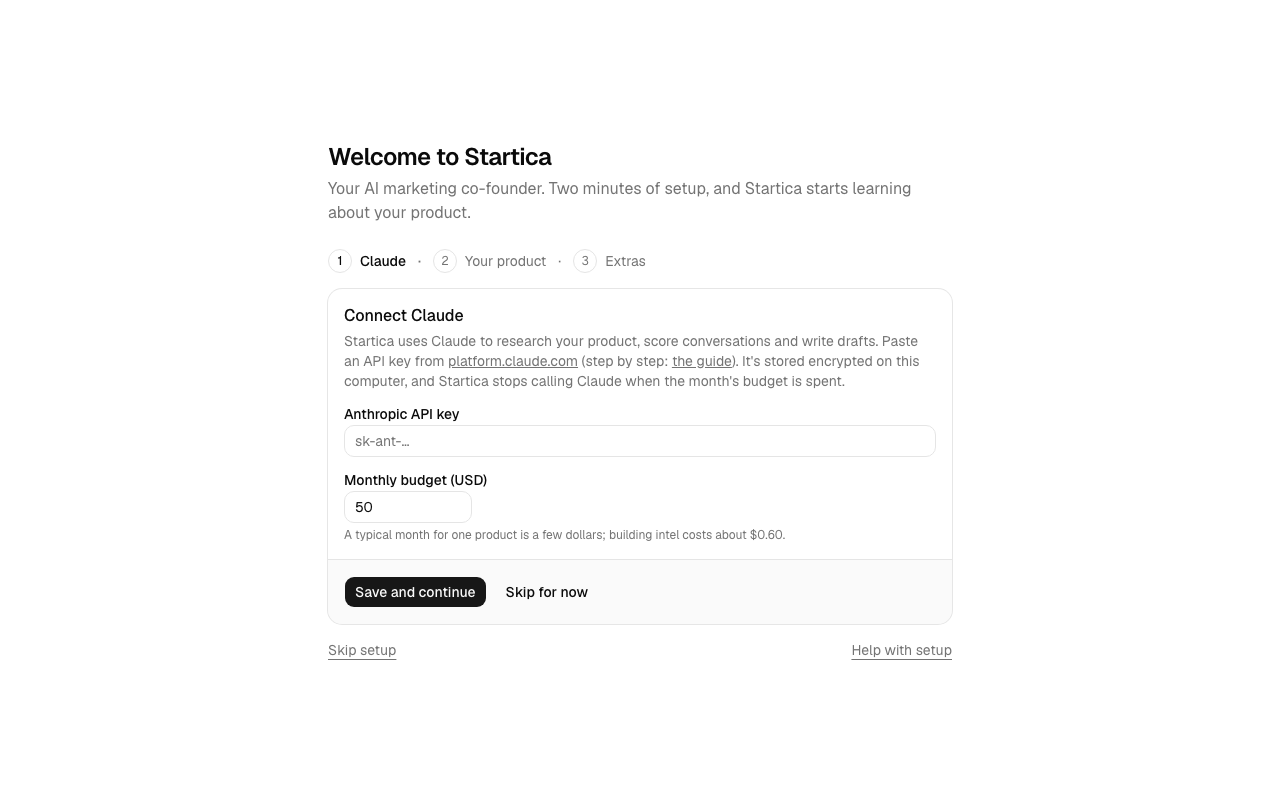
Startica uses AI to research your product, score conversations and write drafts, with your own API key from Claude or OpenAI. The step links to the guide for the provider you pick: Anthropic API key or OpenAI API key.
- Under Provider, pick Claude (Anthropic) or OpenAI.
- Paste your key into Anthropic API key (keys start with
sk-ant-) or OpenAI API key (keys start withsk-). The link under the field opens the page where you create one: platform.claude.com or platform.openai.com. - Set Monthly budget (USD). It starts at $50. As the note under the field says: “A typical month for one product is a few dollars; building intel costs about $0.60.”
- Click Save and continue.
You can add the other provider’s key later in Settings → General → AI. Which provider to pick is up to you: both work for every feature. See How Startica uses AI for the models each one uses.
The key is encrypted with your OS keychain before it’s stored. On macOS, you may see a Keychain prompt the first time. Click Always Allow.
The budget is a hard cap: when this month’s spend reaches it, Startica stops calling the AI until the next month or until you raise it. See Costs and budget.
No key yet? Click Skip for now. Nothing that needs the AI runs until you add one in Settings → General → AI, and Today’s checklist reminds you.
Note
If a key for your provider is already saved in Settings, the wizard starts at step 2.
Step 2: What are you marketing?
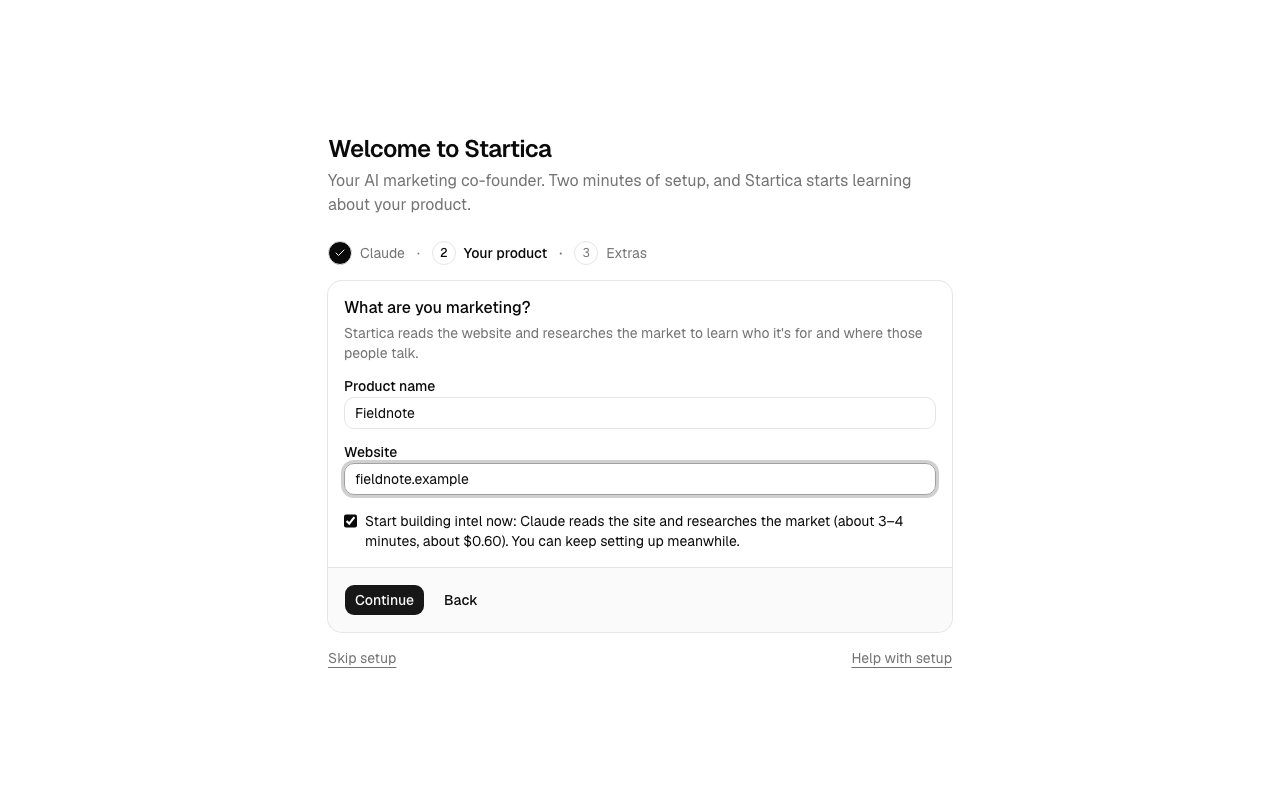
Startica reads your website and researches the market to learn who the product is for and where those people talk.
| Field | What to enter | Example |
|---|---|---|
| Product name | Your product’s name | Fieldnote |
| Website | Its address. You can leave off https://; Startica adds it. |
fieldnote.example |
With an AI key, a checkbox is ticked for you: “Start building intel now: the AI reads the site and researches the market (about 3–4 minutes, under $1). You can keep setting up meanwhile.” Leave it ticked to start right away, or untick it to build intel later from Today.
Without a key, there’s no checkbox. Instead the step says “Without an AI key there’s no intel yet: add one later, then click Build intel on Today’s checklist.” Adding the key later doesn’t start intel by itself, because a build costs money: once the key is saved, click Build intel on Today’s checklist.
Click Continue. Startica adds the product, makes it the active product, and starts intel if the box was ticked. Back returns to step 1.
The wizard only asks for the name and website. To fill in the one-liner and stage (the stage starts as Launched), click the pencil next to the product in Settings → Products. See Settings.
Step 3: A few extras
While intel builds, the top of this step follows it live:
| Status | What it says |
|---|---|
| Building | “Building intel for product… (3–4 minutes)”, with a spinner |
| Done | “Intel for product is ready.” |
| Failed | “Intel didn’t finish; you can retry it from Today.” |
| Not started | “All optional; you can change these later in Settings.” |
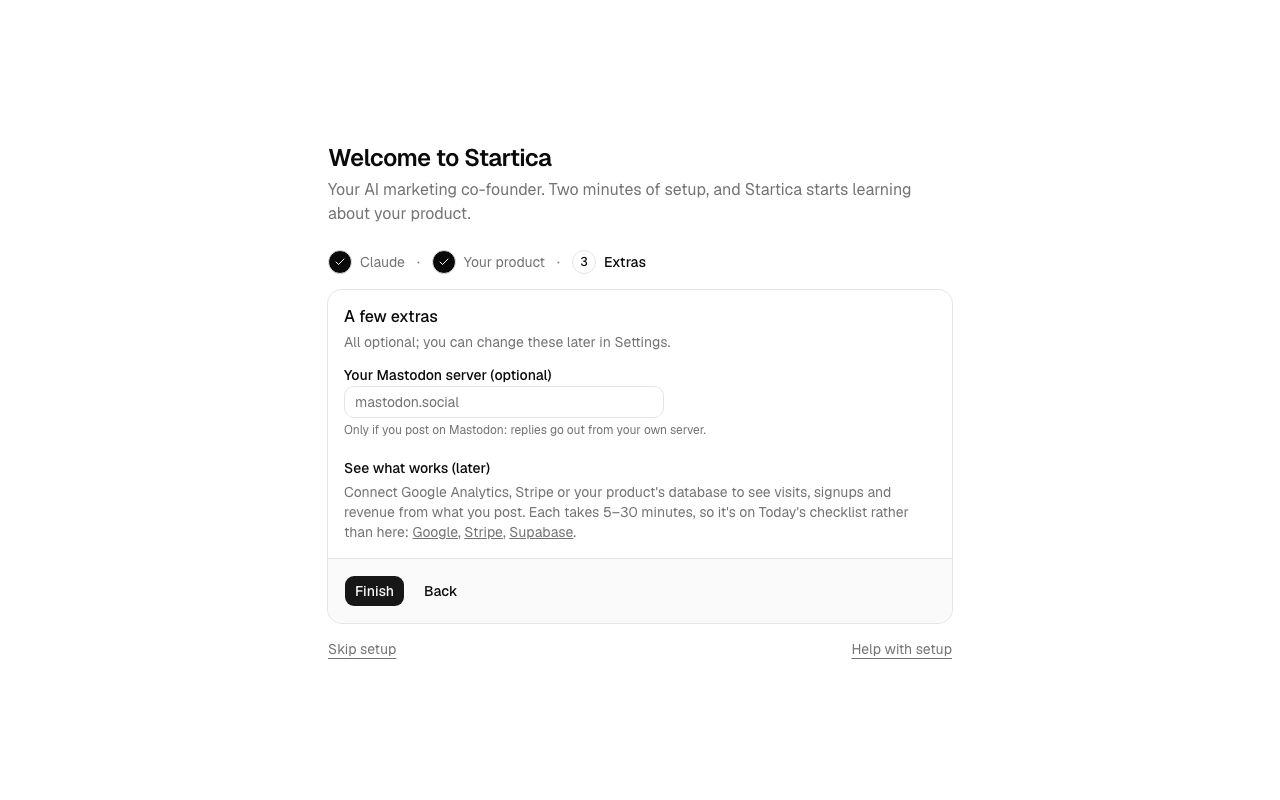
Everything here is optional:
- Open Startica when I log in. Only in the installed app (not dev mode), ticked by default. Startica starts in the menu bar or tray when you log in, so scans and engagement checks keep running. Untick it to turn launching at login off. It’s the same setting as Launch at Login in the tray menu and the checkbox in Settings → General → App. See Running in the background.
- Your Mastodon server (optional). Only if you post on Mastodon: replies go out from your own server, for example
mastodon.social. It’s the same setting as Settings → Channels → Posting. See Posting with Startica. - See what works (later). Links to the Google, Stripe and Supabase (product database) guides. Connecting analytics takes 5 to 30 minutes each, so it’s on Today’s checklist rather than in the wizard.
Click Finish. Startica saves these settings and opens Today.
Back goes to step 1, Connect AI, to add or change your key. It skips step 2 because your product is already saved; to edit it, use Settings → Products.
Skip, demo and help
Below every step:
| Link | What it does |
|---|---|
| Look around with a sample product first | Desktop app only. Restarts Startica with Fieldnote, a sample product, in a separate data folder. Your own data is untouched. See Try the demo. |
| Skip setup | Closes the wizard and opens Today. Anything you already saved (key, product) is kept. The wizard won’t open again on its own. |
| Help with setup | Opens this page. |
If you skip before adding a product, Today says “Set up your first product (or add one in Settings) to get a daily plan.” The first link reopens the wizard.
Run setup again
Settings → General → App → Run setup again reopens the wizard and brings back the Getting started checklist on Today if you hid it.
The wizard starts at the first step that isn’t done. With a key and a product already in place, that’s A few extras. With a product already saved, setup goes from Connect AI straight to the extras (through Save and continue or Skip for now) and never shows the product step. To add another product, use Settings → Products → Add product: the wizard only sets up your first one.
Check that the key works
Open System and click Run test job. Within a few seconds, a ping row appears under Job runs and a call appears under AI calls with status ok. If it fails, the error is in the Result / error column.
To change the key or budget later, open Settings → General → AI and click Change keys or budget. Leave a key field blank to keep the saved key. The same dialog switches provider; see Switching provider.
How intel builds
Intel is the foundation for everything else: listening, scoring, drafting and the roadmap all read from it. Scans skip a product until it has a brief.
If you didn’t start it in the wizard, click Build intel on Today’s checklist, or open Intel and click Build intel. On the Intel page you can first write what the website doesn’t say under Your notes for Startica (who it’s really for, what makes it different, current numbers, communities you already know) and click Save notes. Better notes make better intel.
On the Intel page, the badge next to the button shows progress:
- “Step 1 of 3: reading the product’s website”
- “Step 2 of 3: researching competitors and communities (a few minutes)”
- “Step 3 of 3: writing the brief, personas and lists”
A build takes 3 to 4 minutes and costs well under $1 (about $0.60 on Claude’s defaults). It uses your strategy and research models with web search. When it’s done, the badge says “Ready” and the tabs fill in: Brief, Personas, Competitors, Communities and Keywords. Suggested communities are listed strongest first.
If the build fails, the error shows under the button on the Intel page, and the checklist offers Retry. Fix the cause (often a missing API key or the budget cap) and try again. Builds never retry on their own, so you’re never charged twice without asking.
Tip
Rebuilds replace only what the AI wrote. Anything you add or edit, and every community you mark Watch or Ignore, is kept. If you edit the brief, rebuilds keep your version until you click Let rebuilds update it.
Next
Work through the checklist on Today, from picking communities to your first posted reply: Your first day.